I started off wanting to make one of those clear boxes to hold some Easter goodies, and ended up with this...
The dimensions are 2 x 2 x 3 1/2
This features the Everyday Enchantment DSP which is for FREEEEE..
 Yeah.. you did read that correctly!!
FREE!!!
If you purchase all the items to make this cute birdy box, you qualify to receive the DSP for FREE!
I know!! RIGHT? Here's the list of supplies:
Yeah.. you did read that correctly!!
FREE!!!
If you purchase all the items to make this cute birdy box, you qualify to receive the DSP for FREE!
I know!! RIGHT? Here's the list of supplies:
| 117191 |
| Bird builder | 16.95 |
| 119861 |
| 1-1/4" circle | 15.95 |
| 114323 |
| Window sheets | 4.95 |
| 104294 |
| Sticky strip | 6.95 |
| 122331 |
| Baja Breeze Seam Binding | 6.95 | |
Make sure you add the Everyday Enchantment DSP #126154 to your order! It will show as $0.00
There are LOTS of other goodies in the Sale-a-bration catalog!! Check it out...
'Till next time!
Carol
I made this little project based on the dimensions from Splitcoaststampers resources page Here.
It will hold the 4 note cards we made in my February stamp class?
Didn't attend?...
There.. there...  well here's what you missed.
Each one is made using a different watercolor technique. All are stamped with Black Stazon ink on watercolor paper.
I think we all learned something new that day!
Here is a small tutorial for how to make the flower on the front of the box.
Start by punching out strips from the Lace Ribbon Border punch and cut apart the individual 'flowers' You will need at least 8 or 9 flowers.
I crumpled them up and then opened them back up again.
Punch a 1 inch circle from the same color as your flower.
Add some Tombow liquid glue to the entire surface of the 1 inch circle.
Start adding your 'petals' around in a circle overlapping each one over the top of the last.
well here's what you missed.
Each one is made using a different watercolor technique. All are stamped with Black Stazon ink on watercolor paper.
I think we all learned something new that day!
Here is a small tutorial for how to make the flower on the front of the box.
Start by punching out strips from the Lace Ribbon Border punch and cut apart the individual 'flowers' You will need at least 8 or 9 flowers.
I crumpled them up and then opened them back up again.
Punch a 1 inch circle from the same color as your flower.
Add some Tombow liquid glue to the entire surface of the 1 inch circle.
Start adding your 'petals' around in a circle overlapping each one over the top of the last.  When you add the fifth petal, lift up the first petal that you added and tuck the fifth one under so they are all overlapping each other. Clear as mud?
Next layer... repeat same as the first layer but you will only need 3 petals.
 Punch a hole using the Paper-Piercing Tool ... lovingly called THE POKEY at my stamp classes!
Add the last petal to an Antique brad before inserting into the flower.
Reshape your petals by squishing them up around the brad.
Adhere it to your project using dimensionals. I love those thingys!
DONE!
SHOP 24/7!
Stop in again and stamp with me!
Carol
Punch a hole using the Paper-Piercing Tool ... lovingly called THE POKEY at my stamp classes!
Add the last petal to an Antique brad before inserting into the flower.
Reshape your petals by squishing them up around the brad.
Adhere it to your project using dimensionals. I love those thingys!
DONE!
SHOP 24/7!
Stop in again and stamp with me!
Carol
Here's this week MOJO sketch!
I think the hardest thing about stamping is coming up with a nice layout. WELL.... all the guess work is taken out of coming up with a layout... MOJO sketches do that for you!! Just add COLOR!!
EASY PEASY!! Right?
I made this card for one of the girls in our Birthday Club at work.
I hope she likes it!!
Here's a close up of the main focal point.
Supplies used:
Mixed Bunch #125537
Blossom Punch #125603
Curly Cute # 120510
Twitterpated DSP #125406
Top Note Die #113463
1 inch circle punch #119868
Basic Rhinestones #119246
Happy Stamping!
Carol
How coooooool is this??
This heart cut out was done with the Doily Die! YEP! You read that correctly!
Here's the instructions from Butternut Sage's blog. Click HERE for the link.
She teaches you how to build a shim to lay on top of the die. VERY cool technique!
 Here's the close up of it.
Needed supplies are:
- Whisper White Card Stock #100730
- Real Red Card Stock #102482
- Basic Black Card Stock #121045
- Red Glimmer Paper #121790
Here's the close up of it.
Needed supplies are:
- Whisper White Card Stock #100730
- Real Red Card Stock #102482
- Basic Black Card Stock #121045
- Red Glimmer Paper #121790
-
Doily Die # 125592
-
Framed Tulips Emboss Folder #121809
-
Real Red Satin Ribbon - #117286
-
P.S. I Love You Stamp set - #125462 (clear)
- or
wood-mount #125460
-
Real Red Ink Pad #103133
And remember... you can shop 24/7 at my on-line store: SHOP HERE
GREAT special going on RIGHT NOW!
For every $50 you spend (before s&h and tax) you can choose one item from the Sale-a-bration catalog. If you don't have one... please contract me, and I will be sure to mail you one immediately!!
Happy Stamping!
Carol
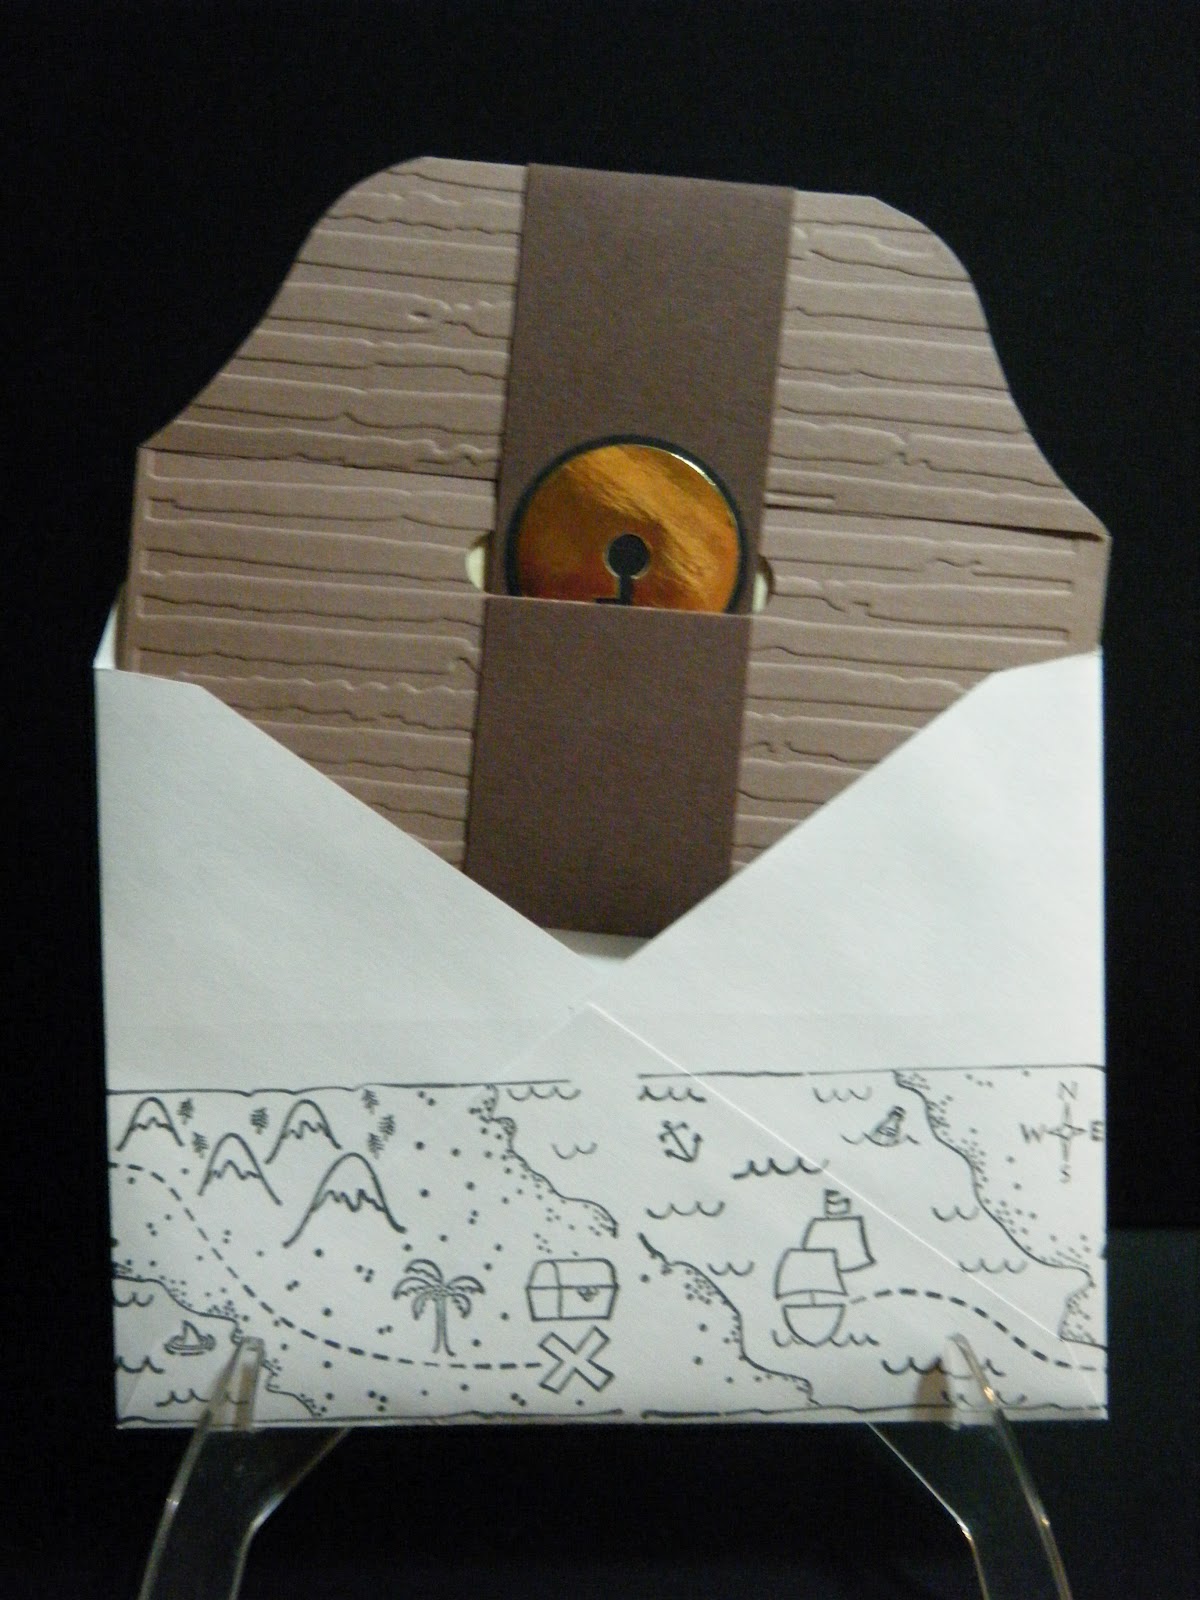
This was a really FUN invitation that I made for my grandsons' pirate birthday party! Aaarrgghhh, Matey!!
This is how the backside of the envelop was stamped... CUTE!! wait.. I mean... AAARRGHH!! CUTE is for girls!
Front of the invitation was embossed using a striped embossing folder.
Gold glossy cardstock for the keyhole, and some brads to embellish.
Inside of invitation was printed on parchment paper in a script font, and we burned the edges of the paper to try to make it look old!
The boys had a super fun party!
Here's another wedding invitation that I made...
Jim & Christine's colors were chocolate and red. This was held shut by a ribbon belly band. The medallion hanging has his last initial on.
You can see the vellum cutout they wanted on the inside of the invitation. The decorative vellum was a hinge so it could be lifted easily to see the actual invitation.
Here you can see the vellum, embossed cover which was partially covering their invitation.
On the right-hand side had a pocket which held their RSVP card and envelop.
The outside of the invitation was stamped with Fall leaves.
Here are some pictures of invitations that I've made in the past... I don't think I ever posted these before:
Here are pictures of our wedding invitations:
This is the very front of the invitation.
Invitation and envelope
< Top part was our invitation
< Bottom was a pocket for the RSVP card and return envelop
< Flap on bottom gave Reception information.
It was a lot of fun making them. Me and Leo worked on them together!


 VE how these product coordinate together? I used the same size framelit to cut out a piece of basic black cardstock, cut it in half, and use it as a mat behind the focal point. The Whisper White cardstock is embossed using the Vintage Wallpaper Textured Embossing folder, and I used the de-bossed side. I like to switch things up a bit!
 ) them back out again. Punch a 1 inch circle from Basic Black card stock, and snip tiny cuts toward the center all around the entire circle.
 ). Stack this on top of the 5 scallops, and use your POKIE to poke a hole to insert your Antique Brad. It reminds me of a poppy flower!